Install Brave Browser with Homebrew

Brave Browser

Part of my dotfiles strategy is to automate most of initial setup in all of my Linux and Unix environments. Although most attention goes towards dedicated and virtual servers, I do explore options for automating my primary macOS workstation – and that’s where Homebrew just keeps on helping.

Install Brave browser in macOS

Yes, the easiest is to download package from the official Brave website. There’s an auto-update functionality there too, to be fair. But regular updates can’t be easily automated. That’s why I think brew install of Brave is a better solution – plus you can update quite a few software packages all at once at regular intervals if you manage them via brew.

IMPORTANT: you will need to remove the previous Brave browser installation, otherwise brew will give you an error:

Remove previous Brave installation before installing with Homebrew

Once that is done, simply run:

$ brew cask install brave-browser

Here is how it will look, only takes a few seconds:

Install Brave browser via brew cask

That’s it! We’ve got the latest version of Brave installed:

Give Brave browser a try – it’s fast and privacy friendly, which is a great combination. Think Brave Ads are coming to Europe and Brave Sync is something that’s constantly being improved between mobile and desktop devices – I keep coming back to this browser to watch its progress.

See Also


How To: Install Docker for Mac

Docker for Mac

Turns out, plenty of native macOS apps can be installed using the brew package manager. Among them is Docker, so I decided to try how it installs and works.

Docker for Mac

The easiest is, of course, just to use the native installer provided by Docker maintaners: you download the Docker.dmg file, install it and end up with an app called Docker Desktop:

Install Docker with brew

But since I wanted to try more automated install, I used brew:

greys@maverick:~ $ brew cask install docker
==> Satisfying dependencies
==> Downloading https://download.docker.com/mac/stable/37199/Docker.dmg
Already downloaded: /Users/greys/Library/Caches/Homebrew/downloads/01aa470f5479ce702d59bc8d825681bca704ab964279558efd5a2187b126791c--Docker.dmg
==> Verifying SHA-256 checksum for Cask 'docker'.
==> Installing Cask docker
==> Moving App 'Docker.app' to '/Applications/Docker.app'.
🍺 docker was successfully installed!
You have mail in /var/mail/greys

That was it! Overall – great improvement of the steps I would normally take to install Docker.

Upon starting this /Applications/Docker.app for the first time, I got the security prompt:

Docker App Security Prompt

But that’s it – after that Docker worked exactly the same and had the very same versions of all the components:

Docker for Mac

Will be trying my most used software installs using brew, it seems a great way to be downloading/installing software in bulk – should be great for new laptop setup (if/when I get it) – I have been upgrading macOS in-place for the past 5 years or so, and think it will be awesome to someday migrate to a brand new clean macOS setup.

See Also


brew Command Not Found

Homebrew for MacOS
Homebrew for MacOS

Quite a few visitors arrived at this blog lately with their reports of “brew command not found“, so I figured a quick post would probably help.

brew is a very popular package manager

Although Homebrew is very popular on MacOS, it’s not a standard tool and not one of the MacOS Commands, so brew does not come preinstalled with your MacOS.

So when you get an error about brew not found, this is quite normal and simply means you’ve never used this software manager before – meaning you need to install it.

How To Install brew in MacOS

The official Homebrew website tells that you simply need to run this command to get started:

/usr/bin/ruby -e "$(curl -fsSL https://raw.githubusercontent.com/Homebrew/install/master/install)"

Here’s how it will probably look:

Once you press Enter, brew install script will download the latest code for brew and deploy it:

The really cool and clever thing about Homebrew is that going forward brew will be auto-updating itself, so you’re pretty much guaranteed to be running the latest and greated code.

That’t is for now. Chat later!

See Also


Install Oh My ZSH!

Screen Shot 2019-06-11 at 15.55.37.png

I have just installed ZSH shell using Homebrew to learn some new Unix shell tricks on my Macbook Pro. Next up is Oh My ZSH. Since this is the official Oh My ZSH installer, it should work on most Linux distros, but I tested it on my Macbook Pro running MacOS Mojave.

Install Oh My ZSH using curl

This command assumes you have curl command installed on your system, curl comes pre-installed with macOS but you may need to install it separately in Linux:

greys@maverick:/ $ sh -c "$(curl -fsSL https://raw.github.com/robbyrussell/oh-my-zsh/master/tools/install.sh)"
Cloning Oh My Zsh...
Cloning into '/Users/greys/.oh-my-zsh'...
remote: Enumerating objects: 1042, done.
remote: Counting objects: 100% (1042/1042), done.
remote: Compressing objects: 100% (959/959), done.
remote: Total 1042 (delta 23), reused 848 (delta 20), pack-reused 0
Receiving objects: 100% (1042/1042), 692.46 KiB | 1.67 MiB/s, done.
Resolving deltas: 100% (23/23), done.

Looking for an existing zsh config...
Using the Oh My Zsh template file and adding it to ~/.zshrc.

Time to change your default shell to zsh:
Do you want to change your default shell to zsh? [Y/n] n
Shell change skipped.

And just like that, we’re done:

Screen Shot 2019-06-11 at 15.57.15.png

See Also


Install ZSH with Homebrew

Screen Shot 2019-06-11 at 15.51.03.png

Just a short node confirming how easy it actually is to get started with zsh using Homebrew.

Installing zsh with Homebrew

greys@maverick:/ $ brew install zsh
Updating Homebrew...
==> Auto-updated Homebrew!
Updated Homebrew from c95cf90e3 to db58b9f41.
Updated 3 taps (homebrew/core, homebrew/cask and wpengine/wpe-cli).
==> New Formulae
drone-cli
==> Updated Formulae
...
==> Installing dependencies for zsh: pcre
==> Installing zsh dependency: pcre
==> Downloading https://homebrew.bintray.com/bottles/pcre-8.43.mojave.bottle.tar.gz
==> Downloading from https://akamai.bintray.com/08/08e7414a7641d1e184c936537ff67f72f52649374d2308b896d4146ccc2c08fe?__gda__=exp=1560264796~hmac=d89c79738040ebb4fb84ec74ee6a7961d6d44ae87b2c5a61c2eb88b97ed8318c&response-content-disposition=attachment%3Bfilename%3D%22pcre-8.43.mojave.bottle.tar.gz%22&response-content-ty
######################################################################## 100.0%
==> Pouring pcre-8.43.mojave.bottle.tar.gz
🍺 /usr/local/Cellar/pcre/8.43: 204 files, 5.5MB
==> Installing zsh
==> Downloading https://homebrew.bintray.com/bottles/zsh-5.7.1.mojave.bottle.tar.gz
==> Downloading from https://akamai.bintray.com/79/793d87f67e64a5e01dfdea890af218e4779a2df514d395b956e464129af16fd7?__gda__=exp=1560264800~hmac=fa482a60a61d2d782e0d7fda208ca76b9cf273f50c1c4b70cebf579b91938b44&response-content-disposition=attachment%3Bfilename%3D%22zsh-5.7.1.mojave.bottle.tar.gz%22&response-content-ty
######################################################################## 100.0%
==> Pouring zsh-5.7.1.mojave.bottle.tar.gz
🍺 /usr/local/Cellar/zsh/5.7.1: 1,515 files, 13.3MB

Now let’s check the version:

greys@maverick:/ $ zsh --version
zsh 5.7.1 (x86_64-apple-darwin18.2.0)
greys@maverick:/ $ which zsh
/usr/local/bin/zsh
greys@maverick:/ $ ls -ald /usr/local/bin/zsh
lrwxr-xr-x 1 greys admin 27 11 Jun 15:41 /usr/local/bin/zsh -> ../Cellar/zsh/5.7.1/bin/zsh

Next step will be to install Oh My ZSH!

See Also


Alacritty – GPU-accelerated Terminal App

Screen Shot 2019-06-07 at 23.54.41.png

Got 5 minutes today to finally try Alacritty, it’s a pretty cool terminal emulator available for major Unix and Unix-like operating systems.

Installing Alacritty in MacOS

Homebrew installation works like a treat:

greys@MacBook-Pro:~ $ brew cask install alacritty
==> Satisfying dependencies
==> Downloading https://github.com/jwilm/alacritty/releases/download/v0.3.2/Alacritty-v0.3.2.dmg
==> Downloading from https://github-production-release-asset-2e65be.s3.amazonaws.com/51980455/f70ead00-651a-11e9-8483-86010190b4c6?X-Amz-Algorithm=AWS
######################################################################## 100.0%
==> Verifying SHA-256 checksum for Cask 'alacritty'.
==> Installing Cask alacritty
==> Moving App 'Alacritty.app' to '/Applications/Alacritty.app'.
🍺 alacritty was successfully installed!

WOW: I did NOT expect this beer mug to actually copy-paste from my iTerm2 window into WordPress! Pretty cool!

Why Alacritty is Cool

A few reasons come to mind:

  • it’s GPU accelerated – meaning it gets faster and works better if you have a decent graphics card – it actually makes visible different when scrolling through large amoutns of command output
  • Alacritty has config file – yep, it’s an old fashioned regular config file – actually it’s YAML but that means it’s still human readable, only structured.
  • Alacritty is multi-platform – Linux, FreeBSD, macOS and even Windows installers are available

See Also


macOS Catalina will have zsh as default shell

unix-tutorial

Time to finally give zsh shell a try, since it will become the default login shell in the upcoming macOS Catalina!

bash will stay default for existing macOS users

Apparently, if you are upgrading to macOS Catalina,  existing users will keep their current shells (BASH most likely). But newly created users will be getting a zsh shell.

zsh shell

zsh is a very popular shell in Unix/Linux, incorporating best features from many other shells like bash, ksh and even csh.

I’ve been meaning to give ZSH a try for some time now, especially since there are great projects like Oh my ZSH make it so powerful. Until macOS Catalina it’s best to install zsh with homebrew.

See Also


MacOS: Alfred 4 is Out

Great news! Alfred, the app launcher and all-around great automator of small things for MacOS (replacement for MacOS Spotlight functionality), has just been upgraded to Alfred 4 version.

My History with Alfred App

I’ve been a user of Alfred App since 2012, it must have been one of the first apps I got installed on my very first MacBook Pro 13″.

Alfred is a free app but has a Powerpack upgrade ooption which I got within 4 months of using this app, and had been receiving for most major upgrades.

My daily use history started in 2017, so about 2 years ago – it’s a great way to look back at the past month to see usage patterns. I’m pretty sure I use only 10-15% of the functionality available in Alfred Powerpack, I think:

Screen Shot 2019-06-03 at 00.29.24.png

In 2016 I upgraded to the lifetime (Mega) license which means any future upgrades are free. I couldn’t pass the opportunity to further support Alfred with v4 upgrade, so I paid another £5 to get a “Legendary License”:

Screen Shot 2019-06-03 at 00.24.54.png

What Alfred App Does

Alfred App is a launcher: you press a shortcut (that you can configure) and it shows you a prompt for Alfred command:

Screen Shot 2019-06-03 at 00.40.27.png

You then type commands or file names and Alfred assists you.

I quite often use it for basic calculations – you just type the expression and it shows you answer right away:

Screen Shot 2019-06-03 at 00.40.38.png

I also find most of apps via Alfred – you start typing name of the app and it shows you the results that you can click or select using suggested shortcut to start:

Screen Shot 2019-06-03 at 00.40.54.png

If you type something Alfred can’t find on your Mac, you’ll be offered options to search for it on Google or any other search engines or marketplaces that you can configure:

Screen Shot 2019-06-03 at 00.41.14.png

See Also


Great WWDC 2019 Keynote!

Screen Shot 2019-06-04 at 00.03.19.pngI missed the WWDC 2019 live stream earlier today as it’s a bank holiday in Ireland and we were away having picnic. But looking at the summaries available online and on Youtube, it’s been a great keynote and one of the biggest and most exciting announcements of the year!
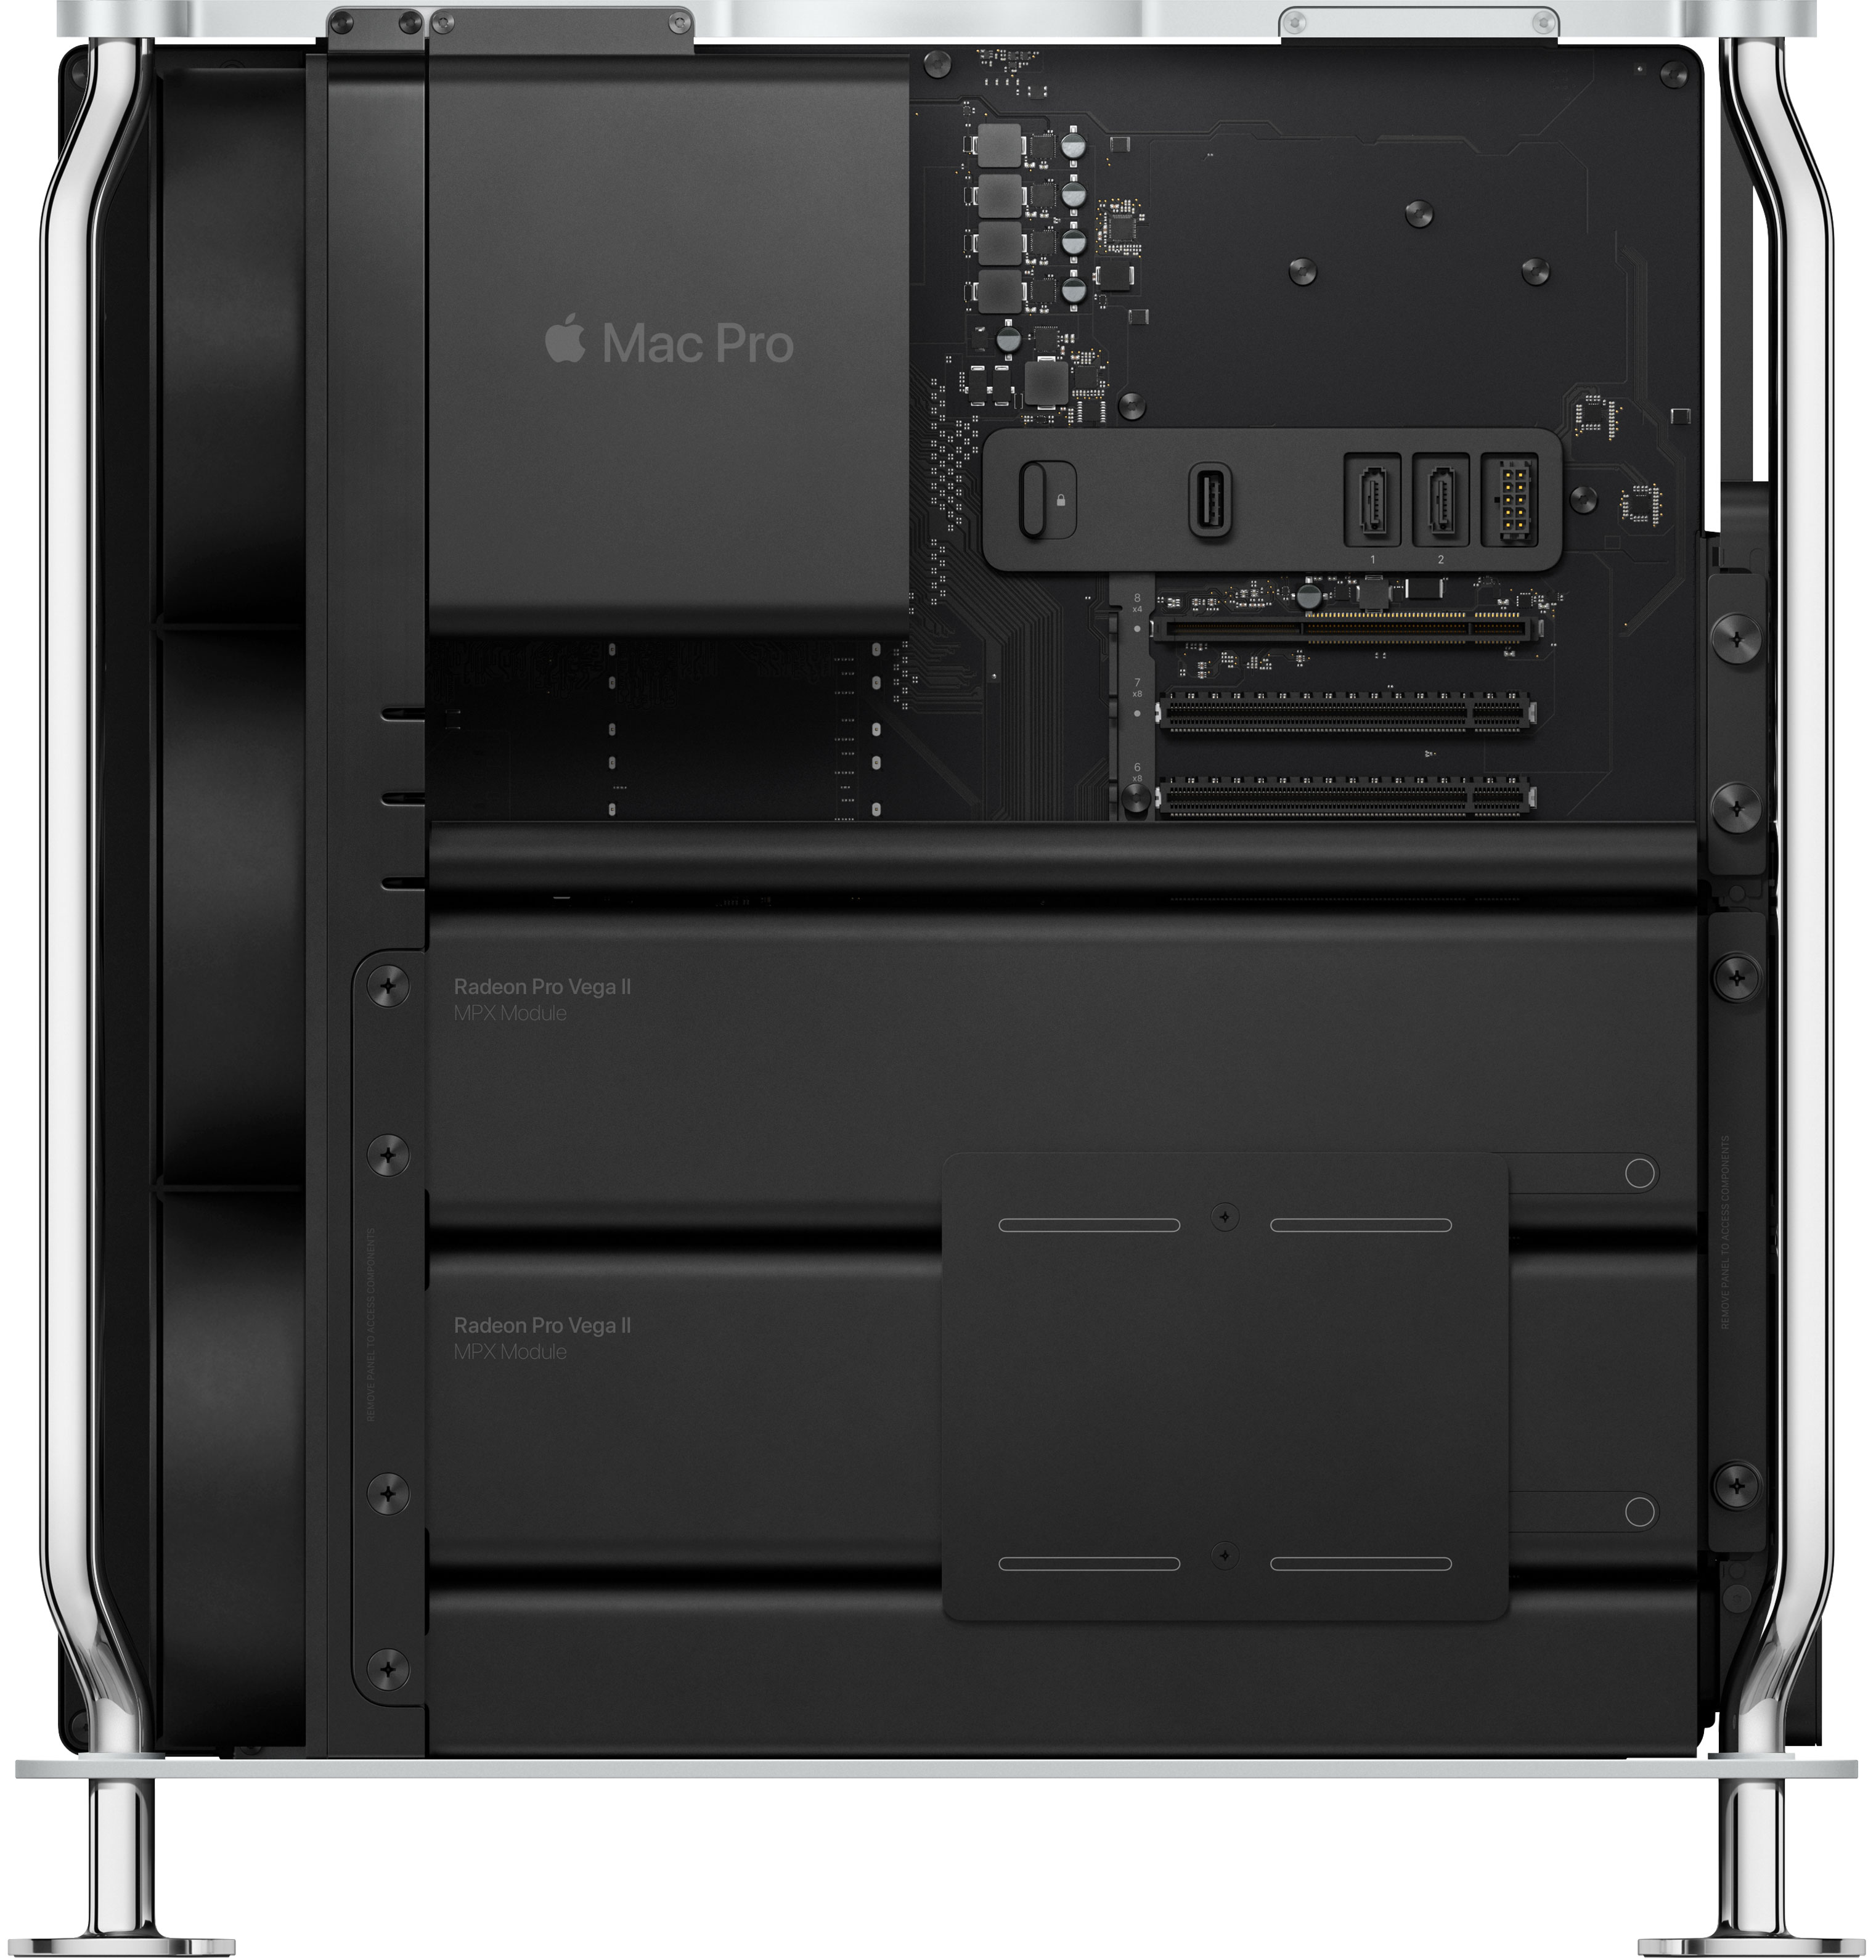
Mac Pro

Finally, a Mac desktop catering to professional needs: powerdful processor with up to 28 cores (will there be a dual CPU option?), lots of RAM (up to 1.5TB) and lots of PCI-e expansion slots.

Especially impressive is the amount of detail and planning that went into expansion slots, like the specialised graphics card solution supporting a range of GPU options.

Internal design of the case is most impressive, CPU cooling is really cool! Hope this system is quiet enough, although with powerful components like this there’s always going to be a compromise.

https://www.apple.com/v/mac-pro/c/images/overview/design_case_inside__b53rnabps882_medium_2x.jpg

macOS 10.15 Catalina

Screen Shot 2019-06-04 at 01.18.47.png

Lots of small and big improvements, especially when it comes to integrated workflows with other Apple devices.

iTunes is being broken down into specialised apps – there’s Music app and Apple TV app, even Podcasts app.

I really like the idea of extending Mac desktop with iPad – in fact I’ve been researching this topic just the other day, looking for ways to use my old iPad 2. This exciting functionality is likely to requrie latest versions of macOS and iOS, so probably won’t help with iPad 2 – but it’s great that Apple are working on something like this at all.

Screen Time is coming to Mac, this should be fun – I’m using this app in our family and really like the stats and the control it provides on iOS platform. Especially cool and thoughful seems to be the “One More Minute” function – meaning you get alerted just in time to save you work before Mac gets locked due to Screen Time limits.

Finaly, Voice Control seems to be super powerful now – I am very interested in trying it out (with new Siri it will be really cool to check tech to speech functionality in macOS).

watchOS

watchOS got a app store and independend apps – this is cool and I expect will let many existing apps grow in functionality and flexibility.

Calculator app, Audiobooks app and solid improvements in exercise tracking. I personally have just discovered cadence setting in the native exercise app on Apple Watch so expect the fitness tracking to only get better.

iPadOS

Hard to say if it’s really a separate OS – looks like a set of plugins for iOS. Wonder if upgrading iPad in September will replace branding from iOS to iPadOS?

iPadOS must have stolen a big part of the show – lots of really cool improvements ranging from native access to USB storage (and direct import from storage into a given iPad app) to multi-tasking and better drang-and-drop.

Home screen looks pretty cool now:

Screen Shot 2019-06-04 at 00.38.44.png

Keyboard gets swiping functionality, called QuickPath. This will quite possibly remove the need to use third party keyboard plugins.

I really like the idea of integrating Files app with cloud provides (Box is there, I hope Dropbox as well).

Photos app gets an uprade – editing and video editing will help for short business and leisure trips where you don’t have access to a desktop or laptop to process photos. I’ve been using Lightroom Mobile for most video processing, though.

Audio sharing with AirPods – simple enough thing, but it means you can stream audio from single device to multiple AirPods.

Finally, Dark Mode is fully enabled now – many iOS apps introduced this a while ago, so this functinality complets the look.

iOS 13

Dark Mode will look awesome!

Photos seem great, especially the part which previews videos right in your photo stream – appears as some photos just come alive.

Maps gets lots of improvements in 3D and 360 degrees previews.

Siri has a new voice that’s meant to sound even more natural and reads incoming messages for you.

Reminders app looks brand new and more powerful. With new smart lists it will be interesting if it’s good enough for a proper to-do lists app or at least can be more flexible as sync solution for other apps like Things.

CarPlay looks awesome, I’ve yet to buy a car that supports it but will now be looking forward to it even more.

See Also


Get X11 Forwarding In macOS High Sierra

I needed to forward X11 output from one of my Linux servers recently to run virt-manager (manager for virtual machines in KVM), and because it’s been a while I had to download and install X11 server again.

As some of you know, Xorg server is no longer shipped/installed with macOS by default. So you have to download it from XQuartz page: https://www.xquartz.org/releases/index.html. Usually you do it, install it and that’s it – no additional steps are needed.

But things are slightly different for the macOS High Sierra, apparently.

The latest release hasn’t been updated since 2016 which I believe is before High Sierra – which explains why things don’t “just work” anymore. Fear not though – I tracked the issue down and it’s explained below.

UPDATE 03/2019: MacOS Mojave works just great, you may skip Step 3 in the procedure below.

Steps to get X11 Forwarding in macOS High Sierra

  1. Download and install the latest release from xquartz.org website
  2. Start XQuartz
  3. IMPORTANT: verify xauth location
    SSH configuration file /etc/ssh/ssh_config might contain path to xauth tool, which may be incorrect depending on your OSX/MacOS version. Here’s how to check:
    greys@maverick:~ $ grep xauth /etc/ssh/sshd_config

    if this returns nothing, you can skip to Step 4 below.  If this gives you an output, compare it to the path from the next command:

    greys@maverick:~ $ which xauth
    /opt/X11/bin/xauth

    If the locations differ, update the /etc/ssh/ssh_config file:

    greys@maverick:~ $ sudo vi /etc/ssh/ssh_config
  4. Connect to remote server using -X option which does X11 forwarding for SSH:
    greys@maverick:~ $ ssh -X centos.unixtutorial.or
  5. Check the DISPLAY variable, it should now be set correctly:
    greys@centos:~ $ echo $DISPLAY
    localhost:10.0

That’s it for today!

See Also