VirtualBox 6.1 Released

VirtualBox 6.1

Has it been a year since VirtualBox 6.0 release already? Time flew! This week brought us the first major release of the VirtualBox 6.x family, with lots of improvements – traditionally focus is on performance and stability.

VirtualBox 6.1 Changelog

Looking at the official changelog for VirtualBox 6.1, I can see the following as very welcome changes:

  • Implemented support for importing a VM from Oracle Cloud Infrastructure – VirtualBox 6.0 previously introduced exporting VMs into the same cloud – this is now a complete workflow
  • New style 3D support (VBoxSVGA and VMSVGA) – old style using VBoxVGA is gone
    • Support YUV2 and related texture formats with hosts using OpenGL (macOS and Linux), which accelerates video playback when 3D is enabled by delegating the color space conversion to the host GPU
  • Virtualization core: recompiler is gone, meaning full CPU hardware virtualization is required now
  • Support for nested hardware-virtualization on Intel CPUs
  • vboximg-mount: Experimental support for direct read-only access to NTFS, FAT and ext2/3/4 filesystems inside a disk image without the need for support on the host – sounds like you can use Windows to run a VM that would access Linux filesystems on attached storage – pretty cool!

I’m quite happy with Parallels Desktop on my macOS systems, but install VirtualBox among the first 5 apps on any Linux laptop or desktop. Have upgraded to 6.1 on my Dell XPS already, will post more screenshots soon!

See Also


HW Virtualization

  • Hardware Virtualization-Desktop-Virtualization-Example.png

This is a quick follow-up post to the rather popular What Hardware Virtualization Really Means post of mine. I constantly see “hw virtualization” queries to this blog, so would like to expand a bit on this topic and key terminology around hardware virtualization.

HW virtualization definition

HW virtualization means the same thing as hardware virtualization: it’s a virtualization solution where end result (virtualization unit, usually a Virtual Machine) provides a completely isolated virtual representation of a hardware platform, running on top of specialised software and hardware.

The purpose of hw virtualization is to allow you run multiple virtual environments with virtual hardware, all sharing physical hardware available on your system. This achieves higher density: instead of running one OS environment per physical server, you can potentially run dozens of same or different OS environments on the same server.

Most common examples of such solutions are desktop virtualization products:

All of these software solutions allow you to create a virtual machine by specifying desired number of virtual CPUs, virtual disks and allocated memory.

Hardware Virtualization vs Hardware Emulation

If you look closely, most of the well known solutions today all provide virtualized environments of the same architecture: x86. This usually means the host (physical server) should be of the same hardware architecture. That’s because virtualization software provides all the VMs with virtualized interfaces to real hardware on your system. The most important component of that is processor (CPU) and CPU instruction set.

If you are looking for a way to run different (non-x86) architectures inside virtual environments, you are going to need a different kind of software – called emulator. Such solutions exist and some indeed provide virtualization capabilities (let you run multiple emulated VMs on top of the same physical system), but at a performance cost: emulators have to emulate (implement using relatively slow software code) every CPU instruction, instead of virtualizing CPU – allowing virtual machines abstracted access to physical CPU where CPU runs its instructions much faster.

HAV – Hardware Assisted Virtualization

This is actually what most people mean when they say hw virtualization: they’re referring to hardware assisted virtualization on desktop and server grade hardware.

Namely, both Intel and AMD processors have special functionality that allows for much more flexible and performant virtualization. Both operating systems and virtualization software check for such HAV support on your system and will usually fail to virtualize on older processors which don’t have hardware assisted virtualization.

Running a Typical x86 Virtual Machine

Once a VM is created, you can attach a virtual DVD drive to it and slot a virtual disk into it – an ISO image of your favourite operating system. Such virtual machine will then be booted and run the installation from ISO image, allowing you to complete OS install and end up with a virtual environment that looks and feels like a real desktop PC, only running rather slowly and inside a window of desktop virtualization software:

Screen Shot 2019-01-10 at 20.10.19.png
VirtualBox 6 running CentOS 7.4 VM

Specifically for improving virtualization and performance of certain components like I/O, memory management and virtual networking, all of such virtualization solutions supply a collection of purpose-built drivers: VMware Tools or Open-VM-Tools, for example. Installing these drivers lets you access VM disks from your host system, set advanced display resolutions, etc.

Running Multiple Virtual Machines

The really attractive benefit of using hardware virtualization is running multiple VMs on the same physical system. Using desktop virtualization example diagram at the top of this post, you can see how a single desktop system running Ubuntu Linux can host and run many virtual machines at once.

Here are examples of various virtualization processes happening in a typical desktop virtualization scenario:

  • Processor virtualization – so instead of 1 physical CPU with 4 cores, you can present 1 or more virtual CPUs (vCPUs) to each of the virtual machines
  • Disk is virtualized and shared – instead of presenting your whole desktop’s disk to each VM, you can create relatively small virtual disks – one or more of them assigned and attached exclusively to each VM.
  • RAM is shared – each VM is presented with a small portion of the actual RAM physically available on the desktop.
  • Network virtualization – each VM has its own virtual network adapter (and you can have more than one), with static or DHCP IP addresses and various network access modes – shared or NAT, etc
  • USB and DVD drives – you can map a physical resource like DVD drive or USB port into a particular VM – this means that the installation DVD with your favourite OS can be used to boot and install OS inside such a VM.

See Also


VirtualBox 6.0

Screen Shot 2019-01-04 at 17.45.34.pngTurns out, VirtualBox 6.0 was released on December 18th, 2018.

Looking at the release notes I have found the following intersting features that I’ve yet to try:

VirtualBox 6.0

  • Nested virtualization – avaialbe only on AMD CPUs for now – this allows you to install a hypervisor like KVM or VirtualBox inside a VirtualBox guest VM – this still needs hw virtualization.
  • Hyper-V support – apparently, VirtualBox will detect if it’s running on a Windows server with Hyper-V activated, and will use Hyper-V as virtualization engine – albeit, it might run slower than native VirtualBox or Hyper-V guest VMs
  • Moving stuff – both disk images and VM metadata can now be moved very easily to a new location
  • Closing VMs improved – there’s now an option to keep the same hardware UUID when closing a guest VM
  • FUSE mount for vdisk images – on Mac OS hosts it’s possible to use a vboximg-mount command for raw access to the virtual disks

I’ve updated my VirtualBox software page with the above notes and will be testing features and sharing.

See Also


How To: Update VM title with virsh

Use virsh desc command to update VM title in KVM

I’m updating and migrating the last few of virtual machines on one of my servers, and realised that there’s a virsh list command option that I really like: it shows descriptive titles in addition to just listing virtual machines.

You know, how we usually run virsh list to see the VMs currently running on a server?

root@s2:/ # virsh list
Id Name State
----------------------------------------------------
1 elk running
4 dbm1 running
6 v9.ts.im running
9 infra running

Well, these VM names aren’t terribly informative. So I like using the virsh list –title command to show the list of VMs with their proper titles:

root@s2:/ # virsh list --title
Id Name State Title
----------------------------------------------------------------------------------
1 elk running Elastic + Logstash + Kibana
4 dbm1 running
6 v9.ts.im running wiki [4vCPU 4GB]
9 infra running infra [4 vCPU 4GB]

And if any VMs are not showing descriptive titles yet, it’s very easy to add it (–live means “apply to the running instance of the VM” and –config means “update the VM information on the disk”). Here’s an example forth dbm1 VM:

root@s2:/ # virsh desc dbm1 --title "MariaDB server [4vCPU 4GB]" --live --config
Domain title updated successfully

…and if we check again, dbm1 VM is now sporting a brand new description:

root@s2:/ # virsh list --title
Id Name State Title
----------------------------------------------------------------------------------
1 elk running Elastic + Logstash + Kibana
4 dbm1 running MariaDB server [4vCPU 4GB]
6 v9.ts.im running wiki [4vCPU 4GB]
9 infra running infra [4 vCPU 4GB]


How To Enable Auto Start for KVM

I had one of my dedicated servers crash the other day and when I fixed it and booted it again, some of my virtual machines didn’t boot.

Turns out, it’s because they didn’t have the autostart enabled:

root@s3:~ # virsh dominfo m
Id: -
Name: m
UUID: f2f9b5aa-7086-89ef-a643-fddb55134ef0
OS Type: hvm
State: shut off
CPU(s): 4
Max memory: 4194304 KiB
Used memory: 4194304 KiB
Persistent: yes
Autostart: disable
Managed save: no
Security model: none
Security DOI: 0

That’s how one can turn the autostart on so that next reboot this VM would start (last parameter is the name of the VM):

root@s3:~ # virsh autostart m     
Domain m marked as autostarted

And just to make sure this actually helped:

root@s3:~ # virsh dominfo m
Id: -
Name: m
UUID: f2f9b5aa-7086-89ef-a643-fddb55134ef0
OS Type: hvm
State: shut off
CPU(s): 4
Max memory: 4194304 KiB
Used memory: 4194304 KiB
Persistent: yes
Autostart: enable
Managed save: no
Security model: none
Security DOI: 0


Disk Performance Tips for VMware Workstation

Lately I’ve been doing a lot of research with virtual machines created in VMware Workstation. And one of the first things you become conscious about is that disk performance in your virtual machine is far from being ideal. Don’t be too quick to blame VMware though, there’s quite a few reasons related to poor I/O, and that’s why I decided to give you a few tips to achieve maximum performance.

1. Pre-allocate virtual disk space

By default, your VMware Workstation doesn’t pre-allocate space for the disks of your virtual machine. This means that as demand for more space inside your VM grows, new storage units are being reserved by VMware Workstation and allocated from the host OS filesystem.

Naturally, such an approach is very expensive performance-wise, but it’s used by the default because it helps you save up space on your host OS filesystem – your virtual machine will only use up as much space as it needs rather than pre-allocating the whole agreed volume of the virtual disk.

Pre-allocation is one of the easiest ways to achieve best performance in VMware Workstation VMs – it creates the file before you get to run your VM, which means when the space is required, your VM will simply use portions of its virtual disk file, without having the VMware Workstation allocating new storage blocks from the host OS filesystem.

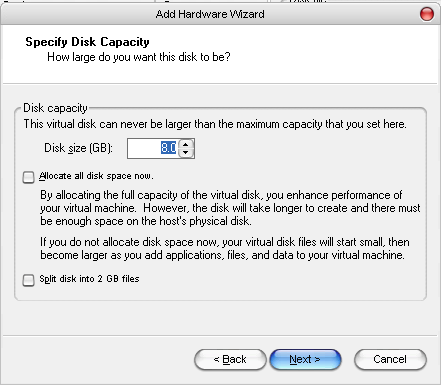
Here’s how a dialogue might look (this is a VMware Workstation 5 screenshot, but it should look similarly in VMware Workstation 6 as well):

VMware Disk Capacity Allocation

Simply tick the “Allocate all disk space now” option.

2. Disable automatic file protection in your anti-virus software

Quite often, the reason you have a less than perfect I/O in your virtual machine is because you have an anti-virus software actively monitoring your host OS filesystem, and every time VMware Workstation access the virtual disk of your VM this file needs to be scanned by the anti-virus software.

Luckily, you can exclude certain files or directories from being scanned by your anti-virus, and in our case simply making sure .vmdk files are skipped is enough to improve the performance.

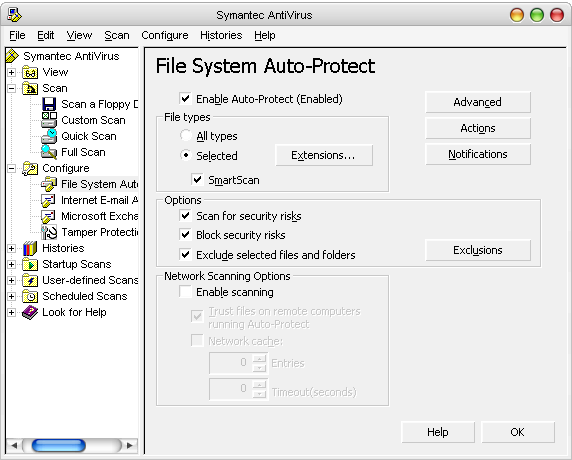
In Symantec AntiVirus, this is done using the File System Auto-Protect dialogue:

File System Auto Protect Dialogue in Symantec AntiVirus

As you can see, there’s a special option there: Exclude selected files and directories, which is not active by default. Once you turn this option on, the Exclusions button to the right of it becomes active (it’s greyed out on this screenshot as you can see).

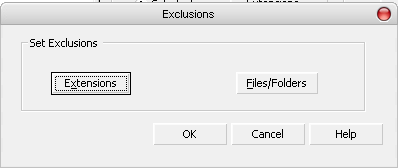
Clicking the button will give you two options: specify the extensions of the files you’d like to be excluded from the auto-protect, or simply point out the files and directories in your filesystem which should be ignored.

Speaking of VMware Workstation, it’s probably easier for you to make the .vmdk extension ignored – this will take care of all the virtual machines and their virtual disk files, wherever they are – you won’t have to specify exact directories, and if you ever move your virtual machine to another directory or disk, you won’t have to change any of these exclusion options again.

File System Auto Protect Exclusions in Symantec AntiVirus

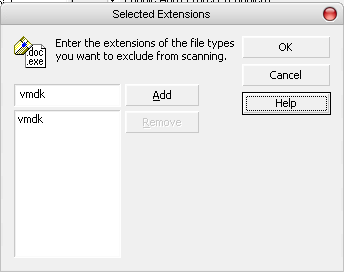
The extensions dialogue looks like this:

File System Auto Protect Extensions in Symantec AntiVirus

Simply specify the extensions you want ignored, and you’re done!

3. De-fragment the host OS filesystem with files for your VMs

This is another very important step: you have to regularly de-fragment the host OS filesystem, because virtual disk files for your VMs are quite large by their nature, and therefore are likely to be defragmented.

With virtual disk space pre-allocation, your will be in a slightly better position, but de-fragmenting the host OS filesystem is still a good idea.

To make it even better, you can create a separate filesystem to store VMs, this way the amount of created/deleted files there will be minimal, thus greatly reducing the filesystem fragmentation.


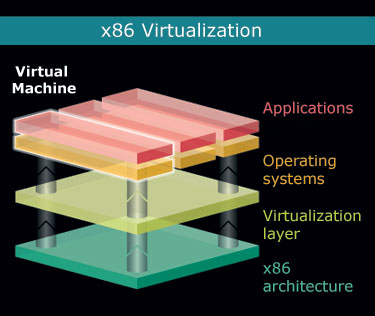
What Hardware Virtualization Really Means

Image courtesy of AMD.com

Many of us have heard about hardware virtualization, but as far as I can see there is still a lot of confusion around this term and surrounding technologies, so today I’ve decided to give a really quick intro. Some time in the future, I’ll probably cover this topic in detail.

What is hardware virtualization?

First of all, let’s agree – in most conversations, when people say hardware virtualization, they really mean hardware assisted virtualization. If you learn to use the correct (latter) form of this term, it will immediately start making more sense.

Hardware assisted virtualization is a common name for two independent but very similar technologies by Intel and AMD which are aimed to improve the processor performance for common virtualization challenges like translating instructions and memory addresses.

AMD virtualization is called AMD-V, and Intel virtualization is known as Intel VT or IVT.

Here’s what AMD has to say about it’s AMD-V technology:

AMD-V™ technology enables processor-optimized virtualization, for a more efficient implementation of virtualization environments that can help you to support more users, more transactions and more resource intensive applications in a virtual environment.

And that’s what Intel says about Intel VT:

With support from the processor, chipset, BIOS, and enabling software, Intel VT improves traditional software-based virtualization. Taking advantage of offloading workloads to system hardware, these integrated features enable virtualization software to provide more streamlined software stacks and “near native” performance characteristics.

Essentially, hardware assisted virtualization means that processors which support it will be more optimized for managing virtual environments, but only if you run a virtualization software which supports such a hardware assistance.

Common myths and confusions about hardware virtualization

There’s a number of ways people misunderstand the technologies behind hardware assisted virtualization, and I’d like to list just a few of the really common ones.

Misunderstanding #1: full virtualization capability built into hardware

People think: Hardware virtualization means your PC has a full virtualization capability built into hardware – you can install a few operating systems and run them in parallel with a special switch on the PC case or a special key on the keyboard for switching between them.

In reality: While it seems like PC-based desktop virtualization technologies head this way, hardware assisted virtualization is not quite there yet. You don’t have a special button on your PC case for switching VMs, and there isn’t a key on your keyboard to do it neither. Most importantly, any kind of virtualization is only possible with the help of hypervisor – a virtualization software which will assist you in creating and managing VMs.

Misunderstanding #2: incredible performance boost with hardware virtualization

People think: Hardware virtualization means your virtual machines will run in parallel at the native speed of your CPUs, so if you have 3 VMs running on a 3Ghz system, each one of them will be working at full 3Ghz speed thanks to AMD-V or Intel VT.

In reality: even with hardware assisted virtualization, your VMs will still be sharing the computational power of your CPUs. So if your CPU is capable of 3Ghz, that’s all your VMs will have access to. It will be up to you to specify how exactly the CPU resources will be shared between VMs through the software (different software solutions offer you various flexibility at this level).

I sense that the common misunderstanding here is that hardware virtualization is a technology similar to multi-core support, which somehow makes one advanced CPU perform as good as 2 or 4 regular ones. This is not the case.

Hardware assisted virtualization optimizes a subset of processor’s functionality, so it makes sense to use it with appropriate software for virtualizing environments, but apart from this a CPU with AMD-V or Intel VT support is still a standard processor which will obey all the common laws of its design features – you will not get more cores or threads than your CPU already has.

Misunderstanding #3: an improvement for every virtualization solution

People think: Every virtualization solution available on the market will benefit from hardware assisted virtualization.

In reality: there’s quite a few solutions which do not use hardware assistance for their virtualization, and therefore won’t really benefit if your CPUs support it. To a surprise of many, the reason such solutions don’t support hardware virtualization is not because they lag behind the rest of the crowd in accepting and supporting new technologies: they simply want to stay flexible and not limit their deployment to the most recent systems.

Bochs and VirtualBox are two good examples of a different approach to virtualization – the binary translation. What this means is that they fully emulate and implement all the x86 instructions in their software, using only standard instructions. While their performance would probably benefit from hardware assisted virtualization support, these solutions enjoy a far better flexibility as they don’t require you to have AMD-V or Intel VT support in order to run. In fact, Bochs doesn’t even need you to have an x86 hardware to run and successfully emulate x86 virtual machines! Sure, it can be slow – but that’s to do with the hardware you’re using – so if you have fast enough CPUs, you will even be able to run Windows on SPARC system.

Final words

That’s it for today. Hopefully this article has helped you understand what hardware assisted virtualization is and, more importantly, what it isn’t. Do come back again as I’ll be expanding this topic in my future posts.

If you notice any discrepancies or feel like this article should be expanded, can you please let me know? I’m not an expect in desktop virtualization (yet) and still learn something new every day, so I’ll be delighted to hear your opinion on the subject.

See Also


Climate Change: How You Can Help Prevent It

Since it’s Blog Action Day 2009 today, I’d like to remind all the readers of my blog how climate change can be prevented by following really simple rules.

Since Unix Tutorial is a technical blog, I’ll try and stay as technical as possible within the topic.

Virtualize to consume less energy, get rid of old hardware

Old servers required a much bigger commitment in the past: not only did they cost a fortune, but they also needed a lot of space and required a lot of power. These days, 1u or 2u server solution can easily outperform a computing system which used to take a whole cabinet in your datacentre. And since the cost of supporting old hardware only increases with each year, it makes a lot of sense to simply but a new server to replace the old infrastructure.

If you’re really big into the whole life cycle thing, an even better approach is to virtualize most of your systems. There are quite a few great solutions today – vSphere from VMware, Xen and KVM based virtualization from RedHat and the xVM family of virtualization solutions by Sun Microsystems (Oracle).

A ratio of 15 virtual machines per 1 physical server isn’t that uncommon, which can give you an idea about the kind of improvement you’ll get by following the route of virtualization.

The math is really simple: shut down 15 old servers, keep only 1 new server running – this means greatly reducing the amount of energy and therefore helping the planet stay green for a bit longer.

Read from your screen, print less

Perhaps on a much smaller scale, the issue of printing materials is also a direction you may want to explore if you’re serious about helping the climate change prevention.

Many of us still print dozens of sheets of A4 paper a day. We print out emails and directions, man pages and screenshots – many of these to never be used again.

Start small and pay attention to every urge of yours to print something out. Ask yourself a few simple questions just to be sure that you absolutely need each piece of the information printed out.

As a Unix administrator, you should find ways to monitor your printing service. Even simple things like weekly stats of the top users printing stuff out might sometimes help you save really big on the paper and toner cost. Many users print stuff out without a certain reason for doing so – it’s just their habit.

This means that if you’re familiar with lpstat and lpadmin commands, you have a chance to help yourself and others become more aware of how much you’re printing and what can be done to break your printing patters.

eInk-based book readers are a great alternative for those of you who claim they absolutely can’t read off screen. It may be a while until A4-sized readers become widely available and affordable, but already you can get a book reader for just a few hundred dollars and this little device can be used for storing and reading of many books – all without much of an environmental impact, since you no longer need paper books.

Use only what you need

You’ll be amazed how much can be saved if you run CPUs on your system at the speed sufficient to fulfill your computational needs instead of having everything running at 100% of their speed!

Many modern servers have power-awareness and intelligence built-in. I especially like blade server solutions – Dell, HP and Sun have all got a range of blade enclosures and blade servers on offer.

The beauty of using blades is that blade enclosures are extremely intelligent and configurable devices – you can use them to cap the power draw for your whole enclosure or a certain blade. Such power limitations will usually result in a lower performance, but for many solutions it’s not critical at all. For example, if your blade hosts a FlexLM licenses server or serves web pages, it will be almost impossible to spot a performance difference even if you significantly lower the CPU speed.

Most operating systems support power management options. For desktops, this means ability to manage the speed of your cooling fans or the speed of your CPU which immediately has an impact. Sometimes you can also control your graphics card in the same manner. If you add screen blanking and hard drives management to this (configuring the sleep times for periods of long inactivity), you have all you need to reduce the power draw of your PC and ultimately help our planet stay the way it currently is or maybe even get refreshed over the next few years.

That’s it for today! Sure enough, these tips may not seem to be all this climate change preventative, but trust me – we all have to participate with however small steps and environmental improvements we can think of.

See also: