Use lsblk Command for Storage Analysis

As I’m working through my very first ebook under the Unix Tutorial brand, I’m learning lots of very interesting things about managing software RAID devices.

Part of effective RAID management is knowing where you stand. I’ve shown you how to use /proc/mdstat already, but today’s command is a higher level one (works with all storage devices, not just RAID).

I use lsblk to report sizes of all the storage devices in my Linux system along with mount points (if known) and RAID membership info.

For each RAID device, you’ll see the following:

  • type of RAID array – raid0, raid5, etc
  • RAID array that any device is a member of

Check this out:

root@ubuntu18:~# lsblk -o NAME,SIZE,FSTYPE,TYPE,MOUNTPOINT
NAME SIZE FSTYPE TYPE MOUNTPOINT
loop0 86.6M squashfs loop /snap/core/4486
loop1 86.9M squashfs loop /snap/core/4917
sda 10G disk
├─sda1 1M part
└─sda2 10G ext4 part /
sdb 1G linux_raid_member disk
└─md0 2G ext4 raid0 /raid0
sdc 1G linux_raid_member disk
└─md0 2G ext4 raid0 /raid0
sdd 1G linux_raid_member disk
└─md1 1023M ext4 raid1
sde 1G linux_raid_member disk
└─md1 1023M ext4 raid1
sdf 1G linux_raid_member disk
└─md2 2G ext4 raid5
sdg 1G linux_raid_member disk
└─md2 2G ext4 raid5
sdh 1G linux_raid_member disk
└─md2 2G ext4 raid5
sdi 1G disk
sdj 1G disk
sr0 1024M rom

In this output you can see that sdb and sdc are members of RAID0 array md0. sdd and sde are forming RAID1 called md1. Finally, sdf/sdg/sdh are members of RAID5 array.


VM – Virtual Machine

This is a post from another blog of mine, which I’m shutting down. I like the way these virtualization concepts were worded in such a relatively simple way, so I’m keeping the post 🙂

Virtual machine (VM) is a software implementation of a machine (computer) that executes programs like a real machine.

Two categories of virtual machines

Virtual machines are separated in two major categories, based on their use and degree of correspondence to any real machine.

A system virtual machine provides a complete system platform which supports the execution of a complete operating system (OS).

In contrast, a process virtual machine is designed to run a single program, which means that it supports a single process. An essential characteristic of a virtual machine is that the software running inside is limited to the resources and abstractions provided by the virtual machine — it cannot break out of its virtual world.

System Virtual Machines

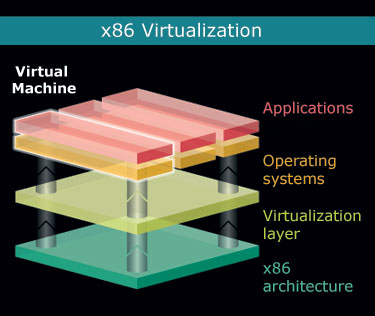
System virtual machines (sometimes called hardware virtual machines) allow the sharing of the underlying physical machine resources between different virtual machines, each running its own operating system. The software layer providing the virtualization is called a virtual machine monitor or hypervisor. A hypervisor can run on bare hardware (Type 1 or native VM) or on top of an operating system (Type 2 or hosted VM).

Main advantages of system VMs

  • multiple OS environments can co-exist on the same computer, in strong isolation from each other;
  • the virtual machine can provide an instruction set architecture (ISA) that is somewhat different from that of the real machine.

Main disadvantages of system VMs

  • there’s still an overhead of the virtualization solution which is used to run and manage a VM, so performance of a VM will be somewhat slower compared to a physical system with comparable configuration
  • virtualization means decoupling from physical hardware available to the host PC, this usually means access to devices needs to go through the virtualization solution and this may not always be possible

Multiple VMs each running their own operating system (called guest operating system) are frequently used in server consolidation, where different services that used to run on individual machines in order to avoid interference are instead run in separate VMs on the same physical machine. This use is frequently called quality-of-service isolation (QoS isolation).

Process Virtual Machines

A process VM, sometimes called an application virtual machine, runs as a normal application inside an OS and supports a single process. It is created when that process is started and destroyed when it exits. Its purpose is to provide a platform-independent programming environment that abstracts away details of the underlying hardware or operating system, and allows a program to execute in the same way on any platform.

A process VM provides a high-level abstraction — that of a high-level programming language (compared to the low-level ISA abstraction of the system VM). Process VMs are implemented using an interpreter; performance comparable to compiled programming languages is achieved by the use of just-in-time compilation.

This type of VM has become popular with the Java programming language, which is implemented using the Java virtual machine. Another example is the .NET Framework, which runs on a VM called the Common Language Runtime.

See Also


Disk Performance Tips for VMware Workstation

Lately I’ve been doing a lot of research with virtual machines created in VMware Workstation. And one of the first things you become conscious about is that disk performance in your virtual machine is far from being ideal. Don’t be too quick to blame VMware though, there’s quite a few reasons related to poor I/O, and that’s why I decided to give you a few tips to achieve maximum performance.

1. Pre-allocate virtual disk space

By default, your VMware Workstation doesn’t pre-allocate space for the disks of your virtual machine. This means that as demand for more space inside your VM grows, new storage units are being reserved by VMware Workstation and allocated from the host OS filesystem.

Naturally, such an approach is very expensive performance-wise, but it’s used by the default because it helps you save up space on your host OS filesystem – your virtual machine will only use up as much space as it needs rather than pre-allocating the whole agreed volume of the virtual disk.

Pre-allocation is one of the easiest ways to achieve best performance in VMware Workstation VMs – it creates the file before you get to run your VM, which means when the space is required, your VM will simply use portions of its virtual disk file, without having the VMware Workstation allocating new storage blocks from the host OS filesystem.

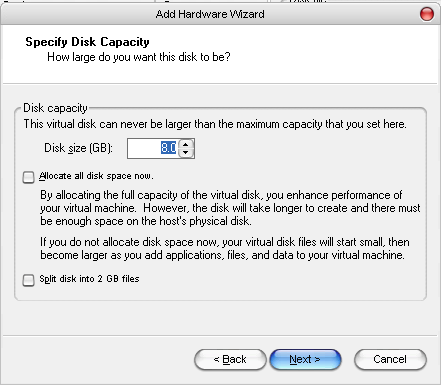
Here’s how a dialogue might look (this is a VMware Workstation 5 screenshot, but it should look similarly in VMware Workstation 6 as well):

VMware Disk Capacity Allocation

Simply tick the “Allocate all disk space now” option.

2. Disable automatic file protection in your anti-virus software

Quite often, the reason you have a less than perfect I/O in your virtual machine is because you have an anti-virus software actively monitoring your host OS filesystem, and every time VMware Workstation access the virtual disk of your VM this file needs to be scanned by the anti-virus software.

Luckily, you can exclude certain files or directories from being scanned by your anti-virus, and in our case simply making sure .vmdk files are skipped is enough to improve the performance.

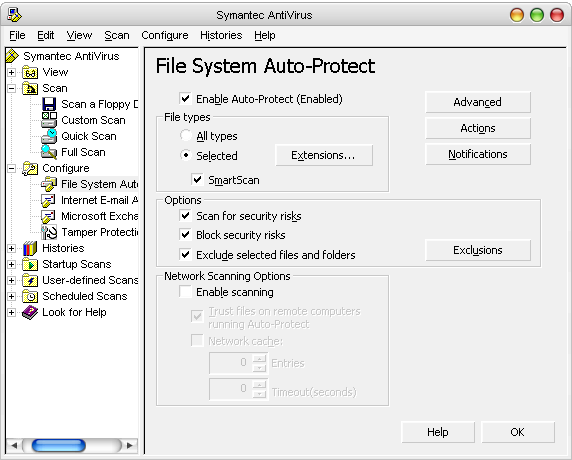
In Symantec AntiVirus, this is done using the File System Auto-Protect dialogue:

File System Auto Protect Dialogue in Symantec AntiVirus

As you can see, there’s a special option there: Exclude selected files and directories, which is not active by default. Once you turn this option on, the Exclusions button to the right of it becomes active (it’s greyed out on this screenshot as you can see).

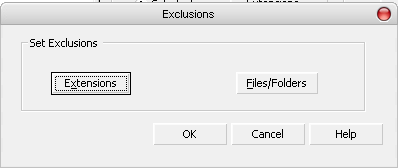
Clicking the button will give you two options: specify the extensions of the files you’d like to be excluded from the auto-protect, or simply point out the files and directories in your filesystem which should be ignored.

Speaking of VMware Workstation, it’s probably easier for you to make the .vmdk extension ignored – this will take care of all the virtual machines and their virtual disk files, wherever they are – you won’t have to specify exact directories, and if you ever move your virtual machine to another directory or disk, you won’t have to change any of these exclusion options again.

File System Auto Protect Exclusions in Symantec AntiVirus

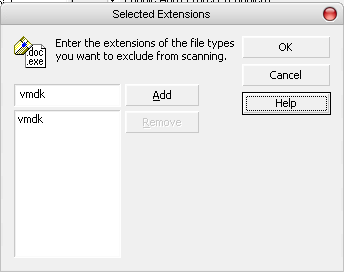
The extensions dialogue looks like this:

File System Auto Protect Extensions in Symantec AntiVirus

Simply specify the extensions you want ignored, and you’re done!

3. De-fragment the host OS filesystem with files for your VMs

This is another very important step: you have to regularly de-fragment the host OS filesystem, because virtual disk files for your VMs are quite large by their nature, and therefore are likely to be defragmented.

With virtual disk space pre-allocation, your will be in a slightly better position, but de-fragmenting the host OS filesystem is still a good idea.

To make it even better, you can create a separate filesystem to store VMs, this way the amount of created/deleted files there will be minimal, thus greatly reducing the filesystem fragmentation.


What Hardware Virtualization Really Means

Image courtesy of AMD.com

Many of us have heard about hardware virtualization, but as far as I can see there is still a lot of confusion around this term and surrounding technologies, so today I’ve decided to give a really quick intro. Some time in the future, I’ll probably cover this topic in detail.

What is hardware virtualization?

First of all, let’s agree – in most conversations, when people say hardware virtualization, they really mean hardware assisted virtualization. If you learn to use the correct (latter) form of this term, it will immediately start making more sense.

Hardware assisted virtualization is a common name for two independent but very similar technologies by Intel and AMD which are aimed to improve the processor performance for common virtualization challenges like translating instructions and memory addresses.

AMD virtualization is called AMD-V, and Intel virtualization is known as Intel VT or IVT.

Here’s what AMD has to say about it’s AMD-V technology:

AMD-V™ technology enables processor-optimized virtualization, for a more efficient implementation of virtualization environments that can help you to support more users, more transactions and more resource intensive applications in a virtual environment.

And that’s what Intel says about Intel VT:

With support from the processor, chipset, BIOS, and enabling software, Intel VT improves traditional software-based virtualization. Taking advantage of offloading workloads to system hardware, these integrated features enable virtualization software to provide more streamlined software stacks and “near native” performance characteristics.

Essentially, hardware assisted virtualization means that processors which support it will be more optimized for managing virtual environments, but only if you run a virtualization software which supports such a hardware assistance.

Common myths and confusions about hardware virtualization

There’s a number of ways people misunderstand the technologies behind hardware assisted virtualization, and I’d like to list just a few of the really common ones.

Misunderstanding #1: full virtualization capability built into hardware

People think: Hardware virtualization means your PC has a full virtualization capability built into hardware – you can install a few operating systems and run them in parallel with a special switch on the PC case or a special key on the keyboard for switching between them.

In reality: While it seems like PC-based desktop virtualization technologies head this way, hardware assisted virtualization is not quite there yet. You don’t have a special button on your PC case for switching VMs, and there isn’t a key on your keyboard to do it neither. Most importantly, any kind of virtualization is only possible with the help of hypervisor – a virtualization software which will assist you in creating and managing VMs.

Misunderstanding #2: incredible performance boost with hardware virtualization

People think: Hardware virtualization means your virtual machines will run in parallel at the native speed of your CPUs, so if you have 3 VMs running on a 3Ghz system, each one of them will be working at full 3Ghz speed thanks to AMD-V or Intel VT.

In reality: even with hardware assisted virtualization, your VMs will still be sharing the computational power of your CPUs. So if your CPU is capable of 3Ghz, that’s all your VMs will have access to. It will be up to you to specify how exactly the CPU resources will be shared between VMs through the software (different software solutions offer you various flexibility at this level).

I sense that the common misunderstanding here is that hardware virtualization is a technology similar to multi-core support, which somehow makes one advanced CPU perform as good as 2 or 4 regular ones. This is not the case.

Hardware assisted virtualization optimizes a subset of processor’s functionality, so it makes sense to use it with appropriate software for virtualizing environments, but apart from this a CPU with AMD-V or Intel VT support is still a standard processor which will obey all the common laws of its design features – you will not get more cores or threads than your CPU already has.

Misunderstanding #3: an improvement for every virtualization solution

People think: Every virtualization solution available on the market will benefit from hardware assisted virtualization.

In reality: there’s quite a few solutions which do not use hardware assistance for their virtualization, and therefore won’t really benefit if your CPUs support it. To a surprise of many, the reason such solutions don’t support hardware virtualization is not because they lag behind the rest of the crowd in accepting and supporting new technologies: they simply want to stay flexible and not limit their deployment to the most recent systems.

Bochs and VirtualBox are two good examples of a different approach to virtualization – the binary translation. What this means is that they fully emulate and implement all the x86 instructions in their software, using only standard instructions. While their performance would probably benefit from hardware assisted virtualization support, these solutions enjoy a far better flexibility as they don’t require you to have AMD-V or Intel VT support in order to run. In fact, Bochs doesn’t even need you to have an x86 hardware to run and successfully emulate x86 virtual machines! Sure, it can be slow – but that’s to do with the hardware you’re using – so if you have fast enough CPUs, you will even be able to run Windows on SPARC system.

Final words

That’s it for today. Hopefully this article has helped you understand what hardware assisted virtualization is and, more importantly, what it isn’t. Do come back again as I’ll be expanding this topic in my future posts.

If you notice any discrepancies or feel like this article should be expanded, can you please let me know? I’m not an expect in desktop virtualization (yet) and still learn something new every day, so I’ll be delighted to hear your opinion on the subject.

See Also